Wednesday, August 31, 2016

A Full Pond...

It has been a rainy latter half of August here at the house with 8.12 inches of rain since 19 August. All of that rain has led to some tall grass, soft dirt, and a very full pond. We ventured back this evening through the mud to take a look, and gather a few photos of the wildflowers and pond along the way.

My wife, like any good photographer, took every step needed to get the shot she wanted.


And here are a few of my panoramics taken just prior and during sunset.


Thursday, August 25, 2016

Puddle Jumping

A slow moving cold front and disturbance to the west has left us in an active pattern of showers and thunderstorms. Strong storms Tuesday night provided 1.85 inches of rain, and another thunderstorm Wednesday evening dropped 0.60 inches of rain. It's raining again this morning, and more rounds are expected each day through the weekend and perhaps beyond. With all the weather talk out of the way, here's what you came here to see...

After the rain Wednesday evening I convinced the boys to get their boots on and head out into the puddles. The two youngest were the most ambitious, but all three eventually waded into the standing or lightly running water. Here's a few photos of the action, but the animated GIF is best of all as the youngest couldn't quite stick the landing.


Monday, August 22, 2016

How old are our trees?

We've got plenty of trees and tree varieties on our 3 acres thanks to the nearby lowlands and creek. We cut down quite a few dilapidated or dead earlier this summer, and have been trimming more to ensure quality growth. A good question is how old are the trees? The house has only been here since 2008 and I know that very few of the trees were planted with the home; I actually believe just two were planted since then.

Well the 'easy' way to age a tree is to count the tree rings after you cut it down, but you may want to know the age without losing the tree. Instead you can take a core sample of a tree, which is much like coring an apple. This lets you view the tree rings without cutting the whole tree down, but can still damage the tree and invite disease if not sealed properly.

Another way, age the tree by measuring the diameter of the tree and using a growth factor to estimate how long your tree has stood there. The International Society of Arboriculture developed growth factors for numerous trees provided below:


A few quick steps and some math will give you an answer. Measure the trees circumference with a flexible measuring tape, take the circumference and divide by 3.14159 (pi) to obtain the diameter. Subtract from your diameter if your tree has thick bark to get a final diameter, then multiply for the growth factor found in the table above and you have your estimated age!

In our case we measured a black walnut, and ended up with a circumference of 46 inches. 46 divided by 3.14159, equals 14.64. We took off 2 inches as our Walnut had thick and dense bark for a final diameter of 12.64. Multiple 12.64 times the 4.5 growth factor to get just under 57 years old! How cool is that?! 


Sunday, August 21, 2016

Weekend Work...

A successful weekend of accomplishing tasks is complete! We finished up our bed frame and headboard on Saturday, which if you haven't seen you must, check it out here: http://severeplains.blogspot.com/2016/08/woodworking-bed-frame-headboard.html

Today the boys and I headed out to trim up a few trees with loppers and yard wagon. We managed quite a few wagon loads of branches that were low hanging or just needed trimmed for the health of the tree. Along the way we picked an apple from the tree out front, this tree wasn't planted best we can tell as a home hasn't been here more than 8 years or so and this tree is likely 20 years old. On the same note while trimming along the fenceline we came upon a pear, and sure enough there is a pear tree too!


We also took a visit to the pond and saw the usual abundance of frogs, spiders, and dragonflies. Got a nice little family picture too!


Finished off the weekend getting the garage a little more organized and cleaned. And of course the boys had plenty of time to run around, bike, jump, and swing. The two oldest boys both go to school tomorrow!

Saturday, August 20, 2016

Woodworking: Bed Frame & Headboard

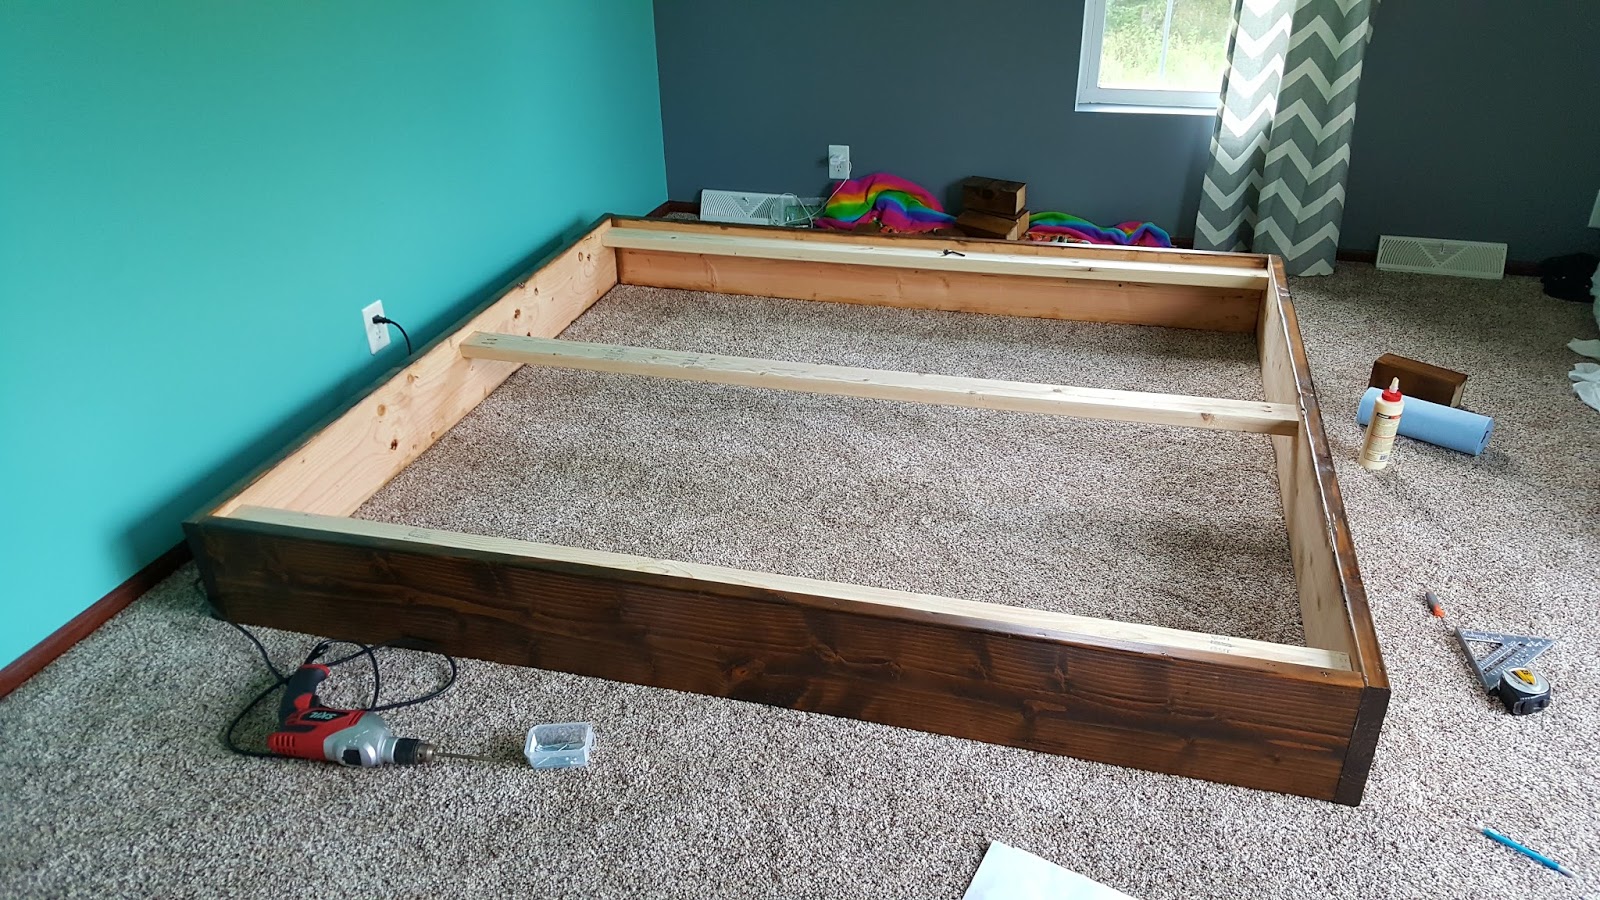
My wife & I needed a new mattress as we were sleeping on one that was at least 15 years old. She has always wanted to get a king size bed, I said we didn't really need a king size bed, so we got a king size bed. Now comes the dilemma of what to do for a bed frame, and do we need a box and mattress? My wife also wanted a headboard as we have never had one, and enjoyed the idea of a rustic wood almost pallet-like headboard. So after venturing around the internet we came upon a neat looking idea and decided to conquer the task of building it all by ourselves. We used basic dimensional lumber, usually pine or 'whitewood', and used my kreg jig to fasten the bed frame together. My wife was responsible for staining using a Dark Walnut stain, brushing on then wiping off to bring out the wood grain and varying the darkness.


This process took quite a while, getting a layer of stain on, then three coats of a polyacrylic finish with the usual wait time and sanding in between. Side note, the polyacrylic was used as it is water-based and doesn't have near the fumes as other finishes can. As this was being finished I managed to put the frame together and the slats for the mattress to sit on.


The bed frame is made with 2x8 for sides, 1x3 for accent edge, 4x4 for legs, 2x4 and 1x2 for matress support and slats. Not a bad start, but the headboard was next which was made with 1x6 and 1x3 and attached to the wall using 2x6 cut at angles. The headboard is made with varying lengths of boards to give it a neat rustic look and as I mentioned previously the stain was brushed and wiped to give it a varying darkness.


And the finished product, including accents above the headboard to complete the bedroom wall. Let us know what you think! Matching bedside tables are likely next on the list.


Tuesday, August 16, 2016

Naked Ladies...

Nope, the title of this post is not a mistake, it is about Naked Ladies. The flower that is...

My wife noticed them coming up alongside the driveway and soon after in a few other spots where an outbuilding used to sit. They bloomed at the beginning of August and have now faded away. For those of you who want to refer to them as another name they are also called a Belladonna Lily.


Saturday, August 13, 2016

Family Reunion & Traveling

The first weekend of August was spent along the Iowa/Minnesota border attending the Anderson Family Reunion; extended family of Alyssa. Plenty of time on the lake, the river canoeing, and sitting around a fire. The boys were able to play with a puppy (all 50+ pounds) and the chickens at the house. The boys reinstated the idea that we need to have chickens, and I think by next Spring that'll probably be in the works. The oldest also got to drive a jet ski, with some help of course, and never wanted to leave the water. The youngest two had one night of camping in the tent alongside Alyssa and I, and I think that ended up being enough for them.

The boys also had a few science camp experiments thanks to a former school teacher that loves interactive play. Here's the middle boy having his fun during science time:


Following the reunion I had a trip to Hutchinson, Kansas with work so the next thing we knew we were headed into the middle of August!

Wednesday, August 3, 2016

Catching Up...

It has been awhile...

This past weekend was finally cooler, albeit still well in 80s and humid, and we managed 1.77 inches of rain with a few rounds of thunderstorms. Friday night we headed out to another rodeo, this one in the small town of Circleville just to our north. Not too many riders showed up, perhaps because it was the Friday evening rather than Saturday, but the boys still enjoyed seeing the animals. The youngest is convinced that he wants to do Mutten-busting and has been wearing around his cowboy hat since the weekend.


Alyssa and I have also started and been working on our big project... Our new bedframe and headboard which will be solid wood, stained, and finished in the coming week (hopefully). I'll have a full post on this project once it is completed.


Oh... Last night I attempted to install the light in the basement bedroom, and ended up failing. Thankfully this wasn't really a fault of my own. The electrical box for the cieling fan was not mounted low enough to be flush with the drop down ceiling, hence the light fixture can't screw on. And for the icing on the cake, the screw into the center of the box for support broke at the base of the nut when I was going to attempt to lower it. Another day...